How to take backup of System Registry

What is Registry?


Windows Registry is a hierarchical database that stores configuration settings and options on Microsoft Windows operating systems. It contains settings for low-level operating system components and for running applications.

The data stored in the registry varies according to the version of Microsoft Windows.

Note :- You should not edit registry data that does not belong to your application unless it is absolutely necessary. If there is an error in the registry, your system may not function properly.

Before you make changes to a registry key or subkey, we recommend that you export, or make a backup copy, of the key or subkey. You can save the backup copy to a location you specify, such as a folder on your hard disk or a removable storage device. If you make changes that you want to undo, you can import the backup copy.

How to Take Backup Of Windows Registry?


Windows 8.1 and Windows 8


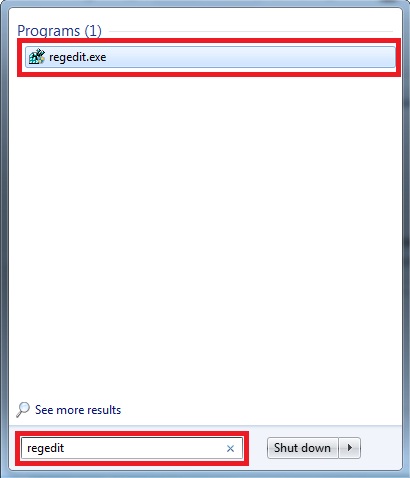
1. Press Windows Key on Keyboard and start typing in Search Box.


2. In the Search Box, type regedit.exe, and then press Enter. If you are prompted for an administrator password or confirmation, type the password or provide confirmation.


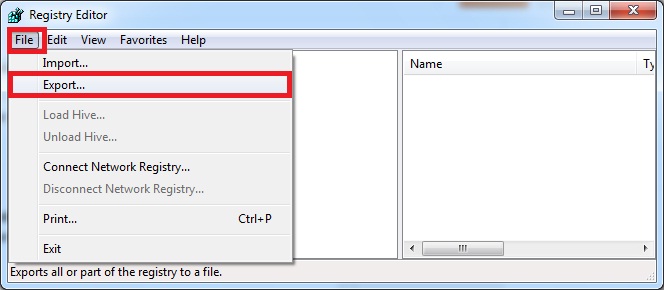
3. In Registry Editor, locate and click the registry key or subkey that you want to back up.
Click File > Export.


4. In the Export Registry File dialog box, select the location where you want to save the backup copy to, and then type a name for the backup file in the File name field.


5. Click Save.

Windows 7 and Windows Vista


1. Click Start, type regedit.exe in the search box, and then press Enter. If you're prompted for an administrator password or confirmation, type the password or provide confirmation.


2. In Registry Editor, locate and click the registry key or subkey that you want to back up.
Click File > Export.


3. In the Export Registry File dialog box, select the location where you want to save the backup copy to, and then type a name for the backup file in the File name field.


4. Click Save.


You can Like our Facebook page to keep yourself updated.


Recover Your Shortcut Affected Files Through Winrar Software

You can recover your Shortcut Virus affected files through "Winrar".


What to do when our Pen drive or PC get caught by the Shortcut virus. 

What is Shortcut Virus?

              I have seen this problem in many PC's even if we have antivirus, when your storage media got infected by some anonymous malware, they change your files into shortcuts with the original folder icons. Just don’t worry, You can use simple steps to recover your files from your storage media using "Winrar" Software.

Steps to Recover Files :-

1. Open WINRAR Application.

2. Navigate to your Pendrive location or PC Folder location.

3. Copy Files and Paste where you want.
4. Format your Pendrive. 
Download Winrar.
Note: If the Drive gets infected again and again ” Make a Boot Time Scan Using Antivirus”

You can Like our Facebook page, to keep yourself updated.

Recover a Forgotten WiFi Password


Recover a Forgotten WiFi Password on Windows


There are passwords like the one we set up for our WiFi network, which once set up and used for connecting to the WiFi network through a device, has no use thereafter.
Since we don’t make use of our WiFi network’s password more than a couple of times, it can be easily forgotten. Forgetting a WiFi network’s password will not cause a big problem to existing connected devices. But if you need to connect a new device to your WiFi network, you need the password or else you have to reset the WiFi router and reconfigure it.
Windows operating systems save the WiFi network’s password, so it is possible to recover a forgotten password with just a couple of clicks.

How to Recover a Forgotten WiFi Password on Windows

1. Go to the Control Panel > Network and Internet > Network and Sharing Center.
Or you can Type “ncpa.cpl” in Run Dialog Box
2. Click on Change Adapter Settings.

3. Right Click on your WiFi Network Connection and select Status. Or Double click on your WiFi network connection.
4. Then click on Wireless Properties.

5. Click on the Security tab in Wireless Network Connection Properties and then click on Show Character Check Box.

There you go, you can now see your WiFi network’s password in the text field beside the Network security key.

Remove Shortcut Icon Arrow in Windows 7

Remove Windows 7 Shortcut Icon Arrow


While the arrow is useful for differentiating between a shortcut and original file or an application, Shortcuts point to files or programs that are stored elsewhere on your hard drive. If you drag and drop a program from start menu to the desktop, you create a shortcut to the original program. To make it clear that it's a shortcut and not the original file, Windows displays an arrow in the lower-left corner of the icon. Since you don’t put shortcuts anywhere except the Desktop or Start menu it isn’t too hard to manage them.
If you don't like the arrows, you can turn them off by editing the Windows Registry or using the free software available. Here is how you get rid of that arrow.

Get Rid of The Windows 7 Shortcut Arrows (Using Regedit.exe):

This method involves manually editing the Windows registry. If you aren’t comfortable with this or editing the registry you might want to use Software freely available to download.

Note : Please take backup of Registry or create a System Restore Point before doing the changes.

Steps :-
1. Click the Start Menu, Type regedit into the search box.

regedit_from_start

2. Browse to the following registry key:
KEY_LOCAL_MACHINE\SOFTWARE\Microsoft\Windows\CurrentVersion\Explorer\Shell Icons
If the Shell Icons key does not exist you’ll need to create it. To do so Right-Click the Explorer key and Select New > Key.

rededit_new_key

Be sure to exactly name the new key Shell Icons.
3. In the Left pane Right Click on the Shell Icons key and Select New > String Value. Name the new string as "29" (Without Quotes).

rededit_new_SV

4. Right or Double-Click the 29 entry to modify it. In the value data box enter the following:
C:\WINDOWS\SYSTEM32\shell32.dll,50

rededit_new_SV_Value_data
5. Click OK to Save changes.
6. You needs to restart your computer for the settings to take effect.
Done!
Now all of your shortcuts should now longer have an arrow overlay in the bottom-left corner!

Revert The Settings :

To change this back simply go back to the registry key and delete the 29 entry.

Note : Please take backup of Registry or create a System Restore Point before doing the changes.


How to Prevent themes from changing Desktop icons


Allow or Prevent themes from changing Desktop icons in Windows 7

We all like to customize the feel and look of our Desktop in Windows Operating System. Users like to change themes, windows colors, icons, mouse pointers, desktop wallpapers and even more to give it a cool new look.

In Windows Operating System one of the most popular customization option is the themes. Changing a theme in Windows involves changing the color, desktop wallpaper, sounds, mouse pointers and maybe icons. If you want to prevent the theme from changing your desktop icons, you can prevent by doing few simple steps.

Prevent themes from changing Desktop icons

1. Right-click on an empty area on your Windows desktop, and click on Personalize.

2. The Personalization settings app will open. Click on Change Desktop Icons in the left panel.
 
CDI1

3. Under Desktop Icon Settings dialog box, Uncheck the Allow themes to change desktop icons option,

CDI2

5. Click on Apply/OK.

6. Close the Personalization window and allow the changes to take effect.

Now no theme will be able to change your favorite icons automatically.

Source : naveenkapil.in/blog